Showing posts with label stamping. Show all posts

Sunday, March 10, 2013

St. Patrick's Day 2012

Here was my Saint Patrick's Day mani for 2012. Enjoy!

 Pinky fingers

 Ring fingers

 Middle fingers

 Index fingers
As you can see, I decided to go with white Konad in the final design rather than the green.

Thumbs


The final mani!

COLORS:
a England Dragon
essie Blanc
essie Pretty Edgy
Rimmel Rags to Riches
Sally Hansen Insta Dri Snappy Sorbet
Sinful Colors Call You Later
Sinful Colors Irish Green
Sinful Colors Olympia
Sinful Colors Pot O Gold

Wednesday, February 29, 2012

Day 8: Metallic

Hello! I revamped the blog for spring time and I hope to be a posting queen tonight. I need some time to myself, and I've decided to devote it to the blog.

This is Day 8: Metallic. I did this mani Valentine's Day. I also added a little "how to" on how I did my gradient to make this mani legitimately metallic.

Here we go!


These first two pictures are of OPI's Excuse Moi! 

Pictured above are the tools I used for the gradient.
As you can see, I used polish, cardboard, tweezers, and a makeup sponge (the wedge-shaped kind).
 Unfortunately, I got a little carried away, and forgot to take pictures. So I will explain my steps:
1.  Put drops of polish on the cardboard. I've found cardboard isn't that absorbent.
2.  Grab your tweezers and pick up the sponge.
3.  Dip the sponge into the polish.
4.  Sponge your nails. Heavily sponge the areas you want thickly covered. Lightly sponge the areas you want to be sparsely covered.

The final product after the gradient sponging! 

Then, I went a little Konad crazy. I added a netting type pattern and hearts. The netting is courtesy of YouMix Cosmetics XL Stamping Plate A and MASH 19. I stamped using the Konad Black and Konad White polish.


BASE COAT
OPI Nail Envy
COLORS
OPI Excuse Moi!
Konad Black
Konad White
TOP COAT
Seche Vite (Excuse Moi! top coat)
Sally Hansen Insta-Dry (gradient and stamping top coat)
STAMPING PLATES
YouMix Cosmetics XL Stamping Plate "A"
MASH 19

Well, there we have it! Hope y'all enjoyed it! :)

Saturday, February 25, 2012

Day 7: Black & White

Hello! So, first off... I apologize. In my Day 6 post I said pictures should be "up soon". Here we are... 3 weeks later. :( I can assure you, that was not my intention. I have been a very busy lady, but, no fear... I have had quite a few manis these past few weeks and I hope to get them posted this weekend.

This black and white one was, fun, frustrating, and awesome. I *really* did not want to take this one off!! It was fun to design. However, I also learned that stamping using my non-dominant hand is a bit... Challenging (hence my frustrations). Pictures now to illustrate the "awesome"! :)

 The MASH plates - 13 and 23 - that were used in this mani.


 The thumbs were mirror images of each other.
NOTE: All the pictures were taken inside under florescent lighting.

BASE COATS:
China Glaze Strong Adhesion
OPI Nail Envy
COLORS:
Sinful Colors Tokyo Pearl
Nicole by OPI Follow Me on Glitter (accent nail - ring finger)
Sinful Colors Black on Black
Konad White
Konad Black
TOP COAT:
Sally Hansen Insta-Dri

Up next, I believe, is rainbow nails. Stay tuned! :)

Wednesday, February 1, 2012

Day 5: Blue

Day 5 has finally arrived for the blog! I didn't get many pictures of this, but, as I said earlier, abysmal weather has taken its toll this winter (it's more like spring, to be honest). However, at the time of this manicure, our area was being hit with its first legitimate "cold snap". So, the blue manicure was well-timed. Matched my blue lips, haha. Brrrr...

Looking at this manicure still makes me cold, actually.


BASE
Mavlava Ridge Filler
BASE COLORS
Orly Sweet Peacock
Sally Hansen Smooth and Perfect Air (ring fingers)
SPONGING COLOR
Sally Hansen Xtreme Wear Celeb City
KONAD COLORS
essie Loophole
Sinful Colors Tokyo Pearl
(I'm sad these two didn't work out)
TOP COAT
Sally Hansen Insta-Dri 10 Day Formula
STAMPING PLATES
Feaux-nad 20
MASH 18

There we have it! I'm currently wearing purple right now, but, it's on its last legs. I'm going through pictures right now. My purple post should be up later today, hopefully! It's a BEAUTY! I LOVE the combination I did!

I'm back!

Hello readers!

I've decided it was a good time for me to update the ol' blog before I got too far behind. School has started and, while having time every now and then to paint my nails and take pictures, it's a different thing entirely to be able to crop, edit, etc. pictures. Also, the weather has just been terrible, and there has been ZERO sunshine to bring out the "pretty" in my pretties! :(

Without much introduction for this one, it was my 2011 National Championship mani for football. The University of Alabama Crimson Tide was hosted by the Louisiana State University Tigers. Well, my significant other is an avid Alabama fan (I myself am a Florida State University Seminole fan). I went for the Tide on his behalf, and, okay, they are kind of my 2nd favorite team; I must say though, they are 2nd favorite waaaaaaaaaaaaaaaaaaay behind my 'Noles. :)

So much for "without much introduction"... Haha. I have one picture of this mani and one picture of the "ingredients". Alabama's colors are crimson and white. They're also known for their hounds-tooth pattern. Enjoy!


BASE COATS
For some reason, I used two. Most likely an experiment, but I fail to remember the results. Oops!
nails inc Kensington Caviar
essie Fill the Gap
COLORS
Sally Hansen Insta-Dri Wined Up
OPI DS Radiance
Wet 'n Wild Ebony Hates Chris
Sally Hansen Xtreme Wear White On
TOP COAT
nails inc Kensington Caviar
Feaux-nad Plate: 63

Monday, December 12, 2011

Day 3: Yellow!

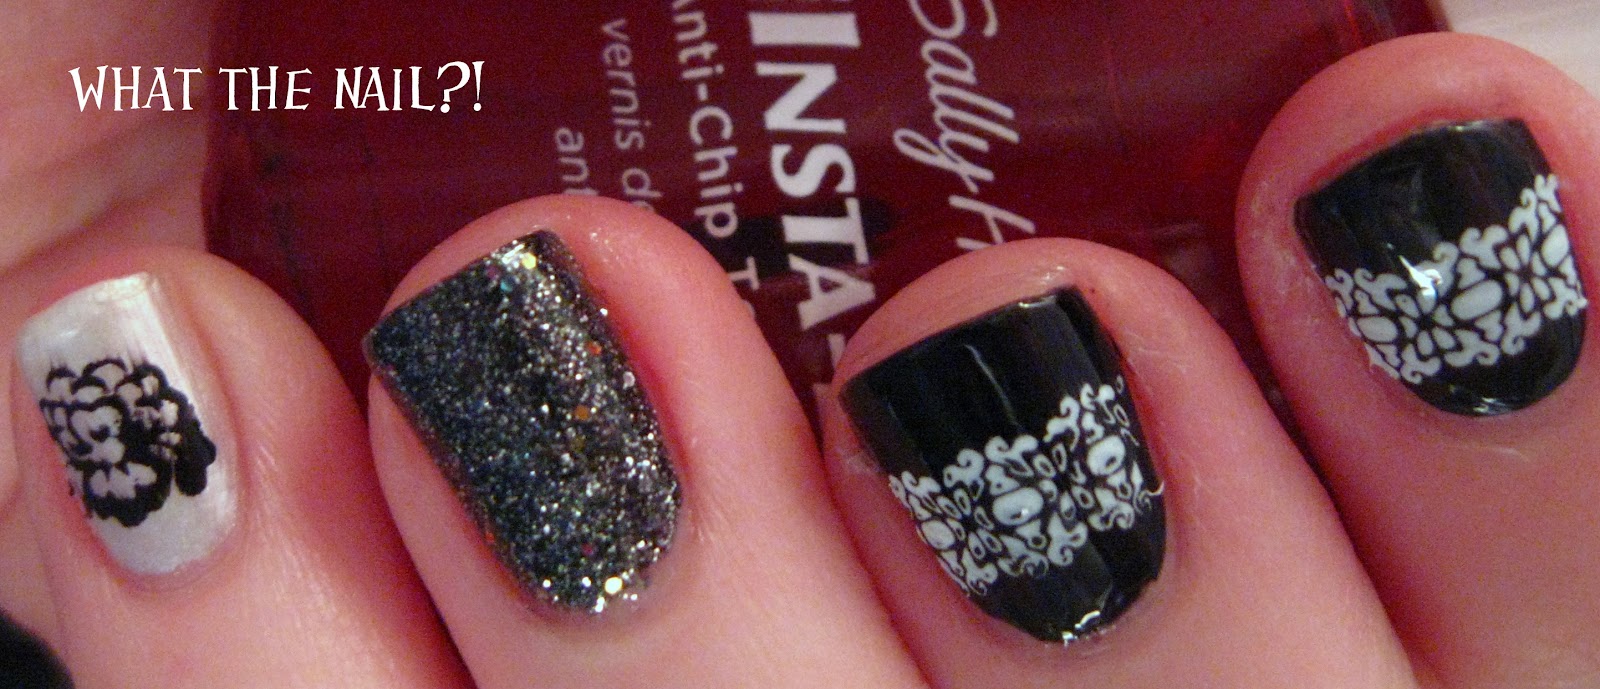
Day 3 was the day for Yellow!

I took yellow and gave it a more "golden" spin for the autumnal season. I hope y'all like it!

And, unfortunately, the time when these photos were taken, it was during a 4 day rainy period, so I have no good pictures with sunshine.
:(

The final mani!

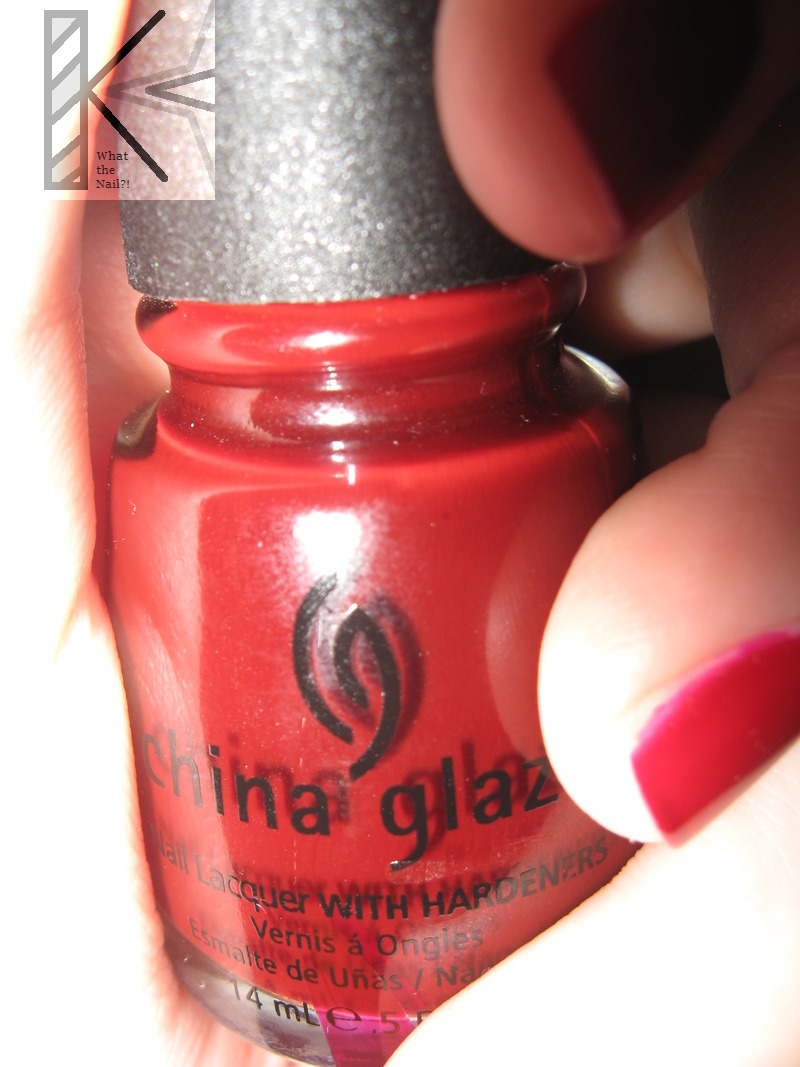
I'm trying to capture the awesomeness that's in this bottle!!!! 

 When you click on the photo for a larger image, you can see the multi-colored glitter that's in this gold!


And, because I can't leave well enough alone, giraffe spots and polka dots!!! 


Products used:

BASE
China Glaze Strong Adhesion Base Coat
COLORS
Sinful Colors - Pull Over (true yellow; first coat)
Sinful Colors - This Is It (shimmery gold; second coat)
FIRST TOP COAT
Sinful Colors - Quick Dry
KONAD COLOR
OPI - DS Radiance
POLKA DOTS
OPI - DS Original
Sally Hansen - Lightening
SECOND TOP COAT
Sally Hansen - Dries Instantly
FEAUX-NAD PLATE
M61


Coming up next is green!! It'll be a few days before I post it... But I know what I plan on doing. I just finished finals so I have a lot of "minor" things to do (for example, laundry, cleaning my room, re-potting plants, other things that take a back seat when graduate school is in full force). I plan on this design being very Christmas-y. I'm going to visit family this Thursday, so I need pretty nails! Right now, my nails are sittin' pretty with just OPI Nail Envy.

I plan to "bring on the green" with some China Glaze Near Dark. I picked up some small acrylic paints to test with, so be prepared for Christmas trees! I might try a little sponging too to make Near Dark more Christmas-tree like. It will be fun!!! I can't wait to paint and post pictures! Let's hope I don't do too terribly! :-/

Monday, November 28, 2011

Day 2 - Orange Nails

Okay, so, I may have cheated a bit. I used this "orange" day for Thanksgiving. It's seasonal and appropriate, I thought. But, I also think I'm a bit of a cop out... I DESPISE the color orange, haha.

Here we are though...


BASE
Sally Hansen - Double Duty
COLORS
Sally Hansen Xtreme Wear - White On (base color for all nails)
Sally Hansen Insta-Dri - Wined Up (Leaves & Polka Dots)
Sally Hansen Insta-Dri - Snappy Sorbet (Leaves)
Sally Hansen Insta-Dri - Lightening (Leaves & Polka Dots)
Sally Hansen Insta-Dri - Mint Sprint (Polka Dots)
Sally Hansen Xtreme Wear - Crushed (Polka Dots)
Essie - Sexy Divide (Polka Dots)
TOP COAT
Seche Vite Fast Dry Top Coat
Feaux-Nad
Plate 47


Next up: Yellow! ...Yikes! haha.

I hope everyone had a wonderful Thanksgiving! :)

Wednesday, November 16, 2011

"Day" 1 - Red Nails

It's time for my "Day" 1 challenge! (As acknowledged in my previous post, I have neither the time or patience in my life to do a new challenge every single day, so I'm doing the challenges leisurely).

For this one, I used China Glaze's Ravishing, Dahling, along with the China Glaze Strong Adhesion base coat and Seche Vite Rapid Dry top coat.

The weather as of late has been MISERABLE. So please forgive my pictures. Also, I did a little stamping on my ring fingers because I got bored with plain red. I may edit this post in the future with a picture or two of me "editing" my nails for a better look; however, I've got a paper to do soon, so I need to really leave my nails ALONE! Haha. :)

Without further ado, here is Ravishing, Dahling!


This is a darker red, which is why I like it. It looks super, super dark in the bottle compared to what it looks like on your nails. I used 3 coats for the results in the pictures. I'm not sure about China Glaze. Their formula is weird or something. It's the first time I've used their polish though, so it may just take some getting used to. Additionally, I used Essie's Blanc for the stamping using Feaux-nad plate 63.

Next up is orange and I have NO idea what to do with orange... I actually hate orange, haha.

Have a good week everyone!! :)